Бэкапы виртуальных машин Hyper-V и обычных компьютеров
Хочу поделиться с вами опытом о том, что у меня отняло море времени — о бэкапах виртуальных машин и обычных компьютеров. Как сделать дешево и красиво.
Пожалуй, начну с того, что если вы хотите бэкапы на VMWare, то готовьтесь платить. Бесплатный VMWare — это бесплатно до тех, пока речь не идет о миграциях, бэкапах и тому подобное. На этом месте можно начать бесконечный холивар, но без моего участия. Мои повествования будут только о Hyper-V на Windows Server 2012R2. Хотя часть статьи можно применить и к VMWare, но, вероятно, будут подводные камни.
Бэкапить на Hyper-V мы можем бесплатно, а точнее, теми средствами Windows, за которые мы уже заплатили, приобретая лицензии Windows Server. Для удобства работы с нашими бэкапами (к тому же за это мы тоже заплатили) будем использовать WDS и дедупликацию (может и групповые политики).
1. Бэкап изнутри виртуальных машин
1.1. Бэкап сегодняшнего дня
Насколько мы знаем, любой Windows умеет делать бэкап. Причем, любые настройки бэкапа Windows через интерфейс сводятся, в конечном счете, к фоновому использованию утилиты wbadmin. А что, собственно, умеет wbadmin? А умеет она делать как бэкап образа с системным разделом, так и бэкап отдельных папок. В данной части статьи нас интересует только бэкап образ (системного раздела). Остальное — это специфичные данные виртуальных машин и бэкапить нужно отдельно. Отсюда вывод: Не храните на системном разделе виртуальных машин (и на обычных компьютерах тоже) никакой ценной информации и баз данных, отдельных приложений. MS SQL Server / MS Exchange / «Сервер приложений 1С» и другое ставим только на не системные разделы или на отдельные диски.
Итак, что же нужно, чтобы бэкап отработал? А нужна всего лишь одна команда:
На самом деле, для этой команды нужны особые права, но о них позже. Сейчас важно понять одну вещь. Данная команда делает не просто бэкап. Она делает инкрементальный бэкап. Причем, для серверных и настольных (клиентских) Windows бэкапы формируются разные. И разница заключается в том, что для серверных ОС у нас получатся снимки каждого бэкапа, а вот для настольных — снимок останется всегда только последний. Спросите, а что это за такой инкрементальный бэкап? А «инкрементальный» он остается, потому что бэкапим мы не весь образ, а только изменившуюся часть со времени последнего бэкапа (а значит и меньше трафика и быстрее создается бэкап).
Те, кто сталкивался с аналогичной ситуацией заметят, что бэкап всегда будет «инкрементальный» (полный). Так как бэкап происходит в нашем случае на сетевой диск. То есть для серверной Windows снимки остаются тоже только последние.
1.2. Бэкап с историей предыдущих снимков
На данный момент, мы сделали бэкап образов виртуальных машин. Но это же у нас бэкап снимков только сегодняшнего дня. Завтра он будет совершенно другой… Но что будет, если бэкапить бэкапы? Да и ещё по-настоящему инкрементально. Так и поступим.
Но мне было этого недостаточно и я сделал так:
Скрипт подключает виртуальный диск из сети. После бэкапа подобный же скрипт отключает диск. ОС помнит, что у диска определена буква E. Но не дай бог подсунуть чужой диск с той же буквой E, бэкап отработает уже по полной (не инкрементально и на чужой диск). Имейте это в виду и используйте, букву, ближе к концу алфавита (X, Y, Z)…
Замечу сразу, если бэкап сегодняшний будет производиться параллельно с бэкапом с историей, то получим в итоге бэкап, который невозможно поднять.
Чтобы достать бэкап предыдущих дней можно воспользоваться интерфейсом (GUI) сервера, на котором производятся бэкапы с историей. Более того, все запуски команды wbadmin в консоли Windows знает и помнит. Служба восстановления даст возможность вам выбрать нужный архив в бэкапах с историей.
2. Бэкап файлов vhdx виртуальных машин
Производится легко и непринужденно:
Но с некоторыми особенностями. Эта команда должна выполняться в PowerShell и с предварительным получением списка виртуальных машин в переменную. За подробным примером обращаемся в Google.
Бэкап виртуальных машин в Windows Server 2012 R2 идет с помощью моментальных снимков Hyper-V. Также замечу, что происходят приостановка работы виртуальных машин, если на них ядро Linux или отсутствуют Hyper-V драйвера. Я лично отказался бэкапить виртуальные машины таким способом. Причина в том, что на Windows Server 2012 (не R2) требовалось останавливать виртуальные машины до бекапа. Да и сейчас на Windows Server 2012 R2 приостановки Linux меня не устраивают, когда есть первый неплохой способ бэкапа. (в комментариях к данной статье есть замечание). После очередного обновления в Windows Server 2012 R2 бэкап любых виртуальных машин проходит без приостановок. ОС Linux также можно бэкапить «изнутри» с помощь Dump (CentOS, Ubuntu), но это отдельная тема с puppet’ами и другим ПО в моем случае.
3. Восстановление бэкапа и WDS
А теперь, по-моему мнению, самая полезная часть этой статьи про бэкапы.
WDS — это Windows Deployment Services (службы развертывания Windows) и часть функционала Windows Server 2012R2. Раньше эта служба называлась RIS, но я с ней не сталкивался. Вообщем, суть WDS проста. Прописались в DHCP (автоматически для DHCP Windows Server) в виде отдельных параметров и далее загружаем на компьютер по сети (такая настройка BIOS компьютера для загрузки по сети) через TFTP загрузчик WDS. Далее загрузчик WDS позволяет выбрать из доступных на ней образов «загрузчиков» Windows. Загрузчики бывают разные — это и образы загрузчиков установщика, и PE, и RE образы. Для загрузчика установщика ещё нужны образы самих Windows в WDS, но это в случае, если нужно установить Windows по сети. Нас интересуют RE образы, которые позволяют поднять машину из бэкапа.
Как и что работает в WDS подробно объяснять не буду. Но вот важные заметки:
4. Особенности дедупликации
Можно дедуплицировать работающие виртуальные машины. Можно дедуплицировать бэкапы сегодняшнего дня и можно дедуплицировать бэкапы с историей. Все это дает большой положительный плюс к объему жестких дисков (как для HDD, так и SSD). Но не стоит забывать о некоторых вещах:
5. Групповые политики
Вот тут можно долго и по-разному реализовывать установку скрипта бэкапа с помощью GPO. Но хотелось бы обратить внимание на важные моменты:
Методы резервного копирования в Hyper-V
Hyper-V позволяет выполнять резервное копирование виртуальных машин из операционной системы узла. При этом на виртуальной машине не нужно запускать специализированное программное обеспечение для резервного копирования. Есть несколько подходов, между которыми могут выбирать разработчики в зависимости от своих потребностей.
Модуль записи VSS Hyper-V
Hyper-V реализует модуль записи VSS во всех версиях Windows Server, поддерживающих Hyper-V. Этот модуль записи VSS позволяет разработчикам использовать существующую инфраструктуру VSS для резервного копирования виртуальных машин. Но он рассчитан на резервное копирование в небольших средах, где для всех виртуальных машин на сервере резервное копирование выполняется одновременно.
Резервное копирование на основе WMI Hyper-V
Начиная с Windows Server 2016 Hyper-V поддерживает резервное копирование с помощью API WMI для Hyper-V. При этом подходе для резервного копирования внутри виртуальной машины по-прежнему используется VSS. Но теперь VSS не используется в операционной системе узла. Вместо этого применяется сочетание опорных точек и отказоустойчивого отслеживания изменений. Это позволяет разработчикам эффективно получать информацию о виртуальных машинах, к которым применяется резервное копирование. Такой подход повышает масштабируемость по сравнению с использованием VSS в узле. Но этот подход можно применять только в Windows Server 2016 и более поздних версий.
Методы чтения резервных копий, созданных на основе WMI
При создании резервных копий виртуальных машин с помощью WMI Hyper-V есть три метода для чтения фактических данных из резервной копии. У каждого есть свои преимущества и недостатки.
Экспорт WMI
Разработчики могут экспортировать данные резервных копий с помощью интерфейсов WMI для Hyper-V (как показано в приведенном выше примере). Hyper-V выполнит компиляцию изменений на виртуальный жесткий диск и скопирует нужный файл в указанное расположение. Этот метод прост в использовании, подходит для всех сценариев и может выполняться удаленно. Но создаваемый виртуальный жесткий диск часто требует передачи по сети больших объемов данных.
API-интерфейсы Win32;
Разработчики могут использовать API SetVirtualDiskInformation, GetVirtualDiskInformation и QueryChangesVirtualDisk на основе набора API Win32 для виртуального жесткого диска, как описано здесь: https://docs.microsoft.com/windows/desktop/api/_vhd/. Обратите внимание, что для использования этих API по-прежнему необходимо применять WMI Hyper-V для создания опорных точек на затронутых виртуальных машинах. После этого API-интерфейсы Win32 предоставят эффективный доступ к данным виртуальной машины, для которой создана резервная копия. У API-интерфейсов Win32 есть несколько ограничений:
Удаленный протокол общего виртуального диска
Наконец, если разработчику нужен эффективный доступ к сведениям о резервных копиях файла, размещенного на общем виртуальном жестком диске, необходимо использовать удаленный протокол общего виртуального диска. Такой протокол описан в этом документе.
Резервное копирование виртуальных машин Hyper-V: текущие тенденции и решения
Несмотря на то, что среда Hyper-V предоставляет довольно много технологий обеспечения высокой доступности и отказоустойчивости виртуальных машин (таких как кластера, Live Migration, репликация, и т.д.), администратору необходимо думать о классическом резервном копировании виртуальных машин. Все эти технологии позволяют минимизировать время недоступности ВМ в различных сценариях, но не обеспечивают возможность восстановления в случаях различных форс мажоров, таких как природные катаклизмы, ошибки персонала, хакерские или вирусные атаки, атаки конкурентов и подобные сценарии. В этой статье я постараюсь рассмотреть основные требования, которые предъявляются к системам резервного копирования Hyper-V, стратегии резервного копирования и возможности бесплатных и коммерческих продуктов резервного копирования.
Вы можете создавать резервные копии виртуальных машин, запущенных на хосте Hyper-V, с помощью встроенного Windows Server Backup (или скриптов на его основе, запускаемых через wbadmin), бесплатных или коммерческих продуктов. Всех эти способ объединяет то, что в основе резервного копирования виртуальных машин Hyper-V лежит технология снапшотов (или снимков). В снимке хранится как состояние виртуальных дисков, так и содержимое памяти и настройки виртуальной машины. Т.е. снапшот представляет собой состояние виртуальной машин на какой-то момент времени.
Как работает резервное копирование виртуальных машин Hyper-V?
Рассмотрим упрощенно схему работы любого современного средства для бэкапа виртуальных машин Hyper-V.
Средство резервного копирования отдает команду хосту Hyper-V на создание снимка. После получения команды на создание снапшота гипервизор создает новые файлы (дельта-файлы) и ВМ продолжает свою работу, сохраняя изменения в этих файлах них. Теперь задача средства резервного копирования скопировать оригинальные файлы ВМ (изменения в них не пишутся) на носитель резервных копий и после этого удалить снапшот. При удалении снимка Hyper-V производит консолидацию (слияние) исходных и дельта файлов, работа ВМ при этом также не прерывается. В случае потери продуктивной ВМ, вы можете восстановить ее состояние на момент даты создания резервной копии.
Основные требования к средствам резервного копирования ВМ Hyper-V
Это в общих чертах о резервном копировании Hyper-V, но на деле возникает куча нюансов и проблем. Попробую перечислить наиболее распространены проблемы:
Далее мы рассмотрим несколько популярных решений по организации резервного копирования ВМ на Hyper-V с точки зрения рассмотренных возможностей.
Резервное копирование Hyper-V с помощью встроенного Windows Server Backup
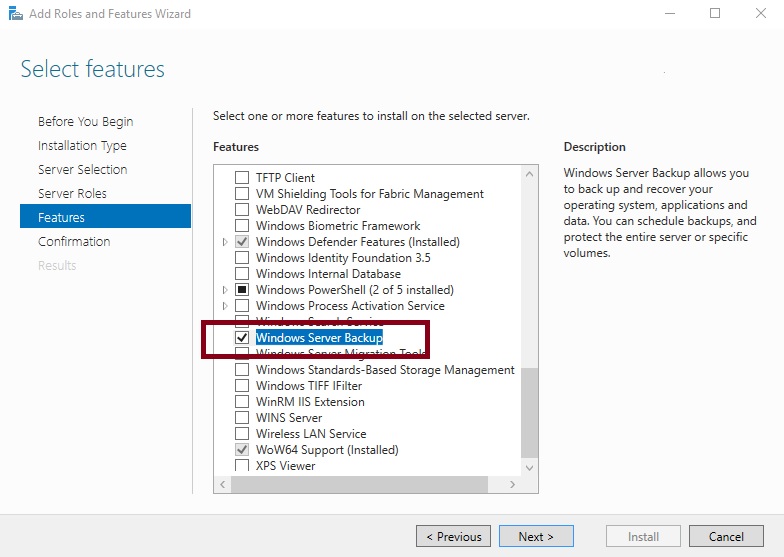
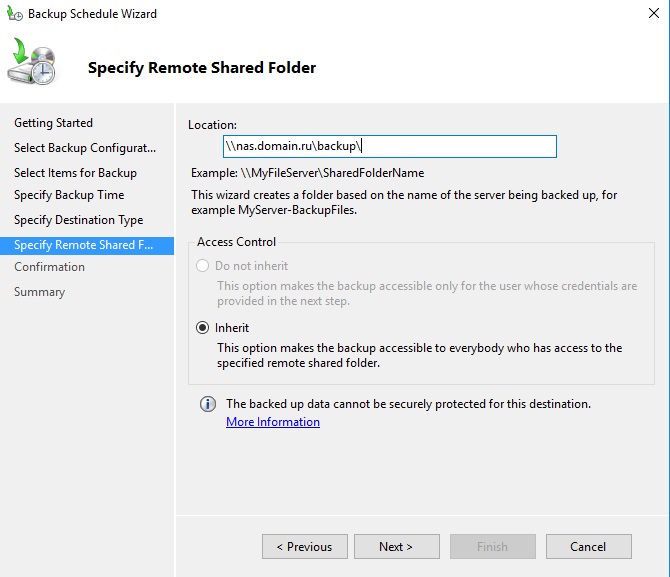
Бесплатный способ организации системы резервного копирования ВМ на Hyper-V предполагает использование встроенного Windows Server Backup через графический мастер резервного копирования/восстановления или утилитой wbadmin (входит в состав WSB). Windows Server Backup поддерживает VSS и инкрементальное копирование, эта фича доступна как в полноценной редакции Windows Server 2012 и выше, так и в Hyper-V. Для установки данного компонента нужно воспользоваться консолью Server Manager или командой:
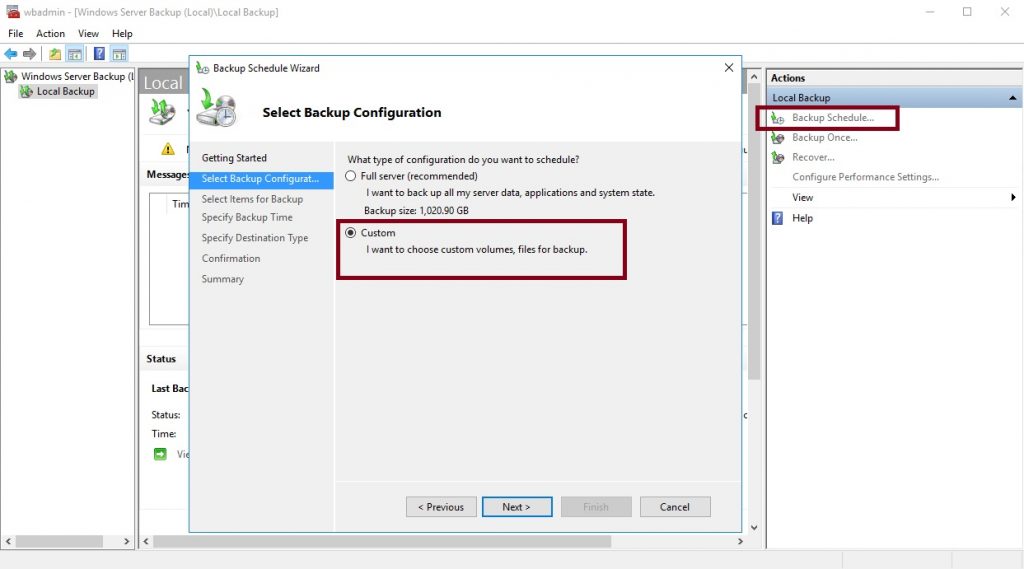
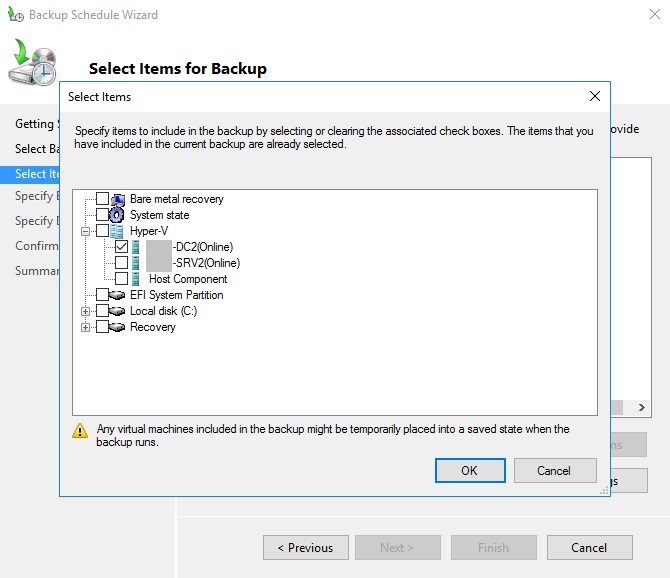
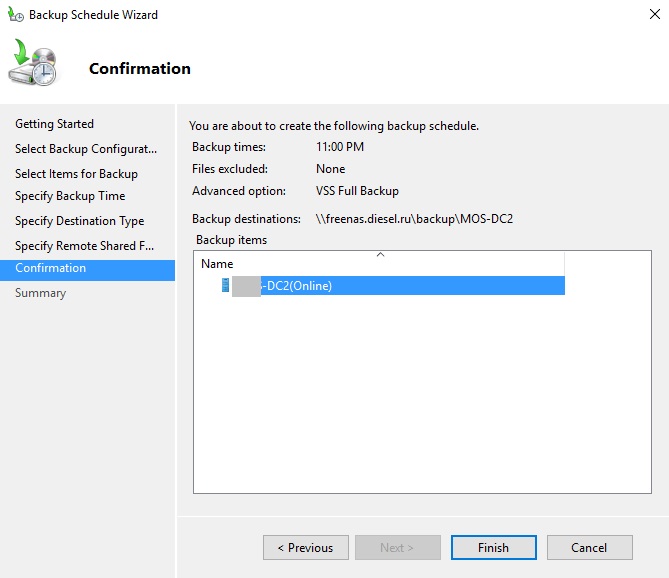
У WSB есть графическая консоль wbadmin.msc, которая позволяет создавать и управлять резервным копированием Hyper-V, создавать расписание резервного копирования и т.д. Для бэкапа ВМ достаточно запустить простой мастер, в котором нужно выбрать какие ВМ с сервера Hyper-V нужно бэкапить, куда, и указать расписание резервного копирования.

Но обычно проще воспользоваться утилитой командной строки wbadmin для бэкапа ВМ Hyper-V. Тем более из графического интерфейса нельзя создать более одного задания резервного копирования ВМ, причем это задание всегда будет перезатирать предыдущие резервные копии.
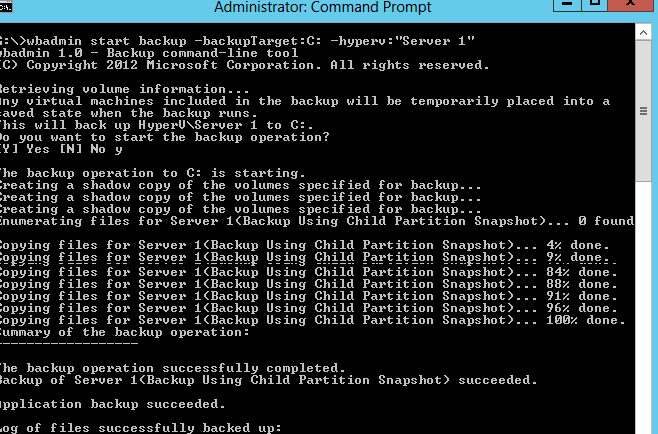
Чтобы создать резервную копию ВМ с именем Server 1 в локальную папку на диске C: (не самая правильная, идея не так, ли), просто выполните команду:
wbadmin start backup –backupTarget:C: –hyperv:»Server 1″
Например, чтобы создать резервную копию двух ВМ и сохранить их в сетевую папку (допустим это внешнее NAS хранилище), достаточно выполнить команду:
Вы можете добавить эту команду в планировщик Windows (с помощью того же PowerShell) и тем самым настроить регулярное создание бэкапов ВМ (старые бэкапы при этом удаляются).
Например, при бэкапе ВМ с контроллером домена AD, вы можете по окончании бэкап сбросить транзакционные логи AD, чтобы база ADDS в резервной копии была в консистентном состоянии (аналогично можно сделать бэкап ВМ с Exchange или SQL Server:
Чтобы получить список зарегистрированных в системе резервных копий, выполните команду:
wbadmin get versions
С восстановлением ВМ из такого бэкапа все также достаточно просто. Однако вы не можете восстановить из бэкапа один конкретный файл или папку, вам придется вручную смонтировать vhdx файл с резервной копией и также вручную скопировать нужный файл.
При всей своей простоте WSB достаточно надежное решение для резервного копирования ВМ Hyper-V, работает довольно быстро и позволяет управлять расписанием резервного копирования. Но конечно, у Windows Server Backup есть свои недостатки:
Сторонние средства резервного копирования Hyper-V

При большом количестве хостов Hyper-V и виртуальных машин, использовать встроенный Windows Server Backup нереально. Вам в любом случае придется выбирать одно из сторонних решений. Однозначно говорить, что тот или иной продукт будет идеальным решением для резервного копирования Hyper-V нельзя, слишком много нюансов нужно учесть. Это и количество хостов, лицензионные ограничения, необходимый функционал, архитектура сети и т.д.
На рынке представлено большое количество коммерческих и бесплатных продуктов для резервного копирования, и запутаться в них очень сложно. Обычно для оценки лидеров ниши используется магический квадрант Gartner. Я нашел такую картинку, характеризующие основных игроков и лидеров на рынке резервного копирования для дата-центров.

Как вы видите, Гартнер среди лидеров решений по резервному копированию выделяет компании и продукты:
В рамках одной статьи оценить и сравнить все продукты довольно сложно, поэтому попробуем рассмотреть возможности нескольких программ – лидеров рынка по резервному копированию Hyper-V.
Я составил небольшую сравнительную таблицу с интересными мне возможностями этих средств резервного копирования (рассматривается функционал версий, актуальных на момент написания статьи).
| Функционал/ Продукт | Veritas Backup Exec 20.2 | Commvault Backup and Recovery 11 | Veeam Backup & Replication 9.5 | Acronis Backup 12.5 |
| Резервное копирование файловых систем | Windows / Linux | Windows / Linux / IBM AIX / HP-UX | Windows / Linux / IBM AIX / HP-UX. Агенты для физических систем автономны, не поддерживают совместное использование хранилищ групповые политики | Windows / Linux |
| Передача резервных копий дисковых массивов по NDMP | + Поддержка NDMP v4+. Список поддерживаемых хранилищ есть на сайте veritas. Не поддерживается инкрементальное и дифференциально копирование, бэкап только LUN целиком и нельзя восстановить отдельные файлы. | + Поддержка прямого резервного копирования данных с файловых устройств NAS. На сайте Commvault есть список поддерживаемых версий файловых систем разных производителей. При использовании этого типа резервного копирования данные отправляются напрямую с NAS через MediaAgent (прокси сервер) на устройство хранения, минуя управляющий сервер CommServe. Поддержка бэкапов отдельных vmdk файлов. | + Поддержка NDMP (v4 и выше) появилась относительно недавно. Поддерживается бэкап только LUN целиком. Поддерживается до 10 точек восстановления (на NetApp до 30). | — |
| Передача моментальных снимков ВМ по SAN | + На сайте Veritas в секции Hardware Compatibility List представлен список совместимых HBA адаптеров, SAN свичей | + Поддерживается бэкап по SAN как для ESXi так и для Hyper-V хостов | + Необходимо дополнительная физическая машина с ролью выделенного прокси сервера Veeam, подключенного к той же сети SAN и презентованными LUN | Поддержка моментальных снимков только в VMware vSphere для хранилищ NetApp с Data ONTAP |
| Репликация резервных копий в несколько хранилищ (в том числе на удаленную площадку) | + | + | + | + |
| Поддержка гранулярного восстановления приложений и БД | Microsoft SQL / Exchange / AD | Microsoft SQL / Exchange / AD / Domino / DB2 / MySQL / Oracle | Microsoft SQL / Exchange / AD / Oracle (только для виртуализированных приложений, не поддерживается на физических системах) | Microsoft SQL / Exchange / AD |
| Управление аппаратными снимками СХД | + | + (IntelliSnap) | + (список поддерживаемых вендоров и моделей СХД ест ь на сайте, для некоторых необходима установка отдельного модуля интеграции) | + |
| Лицензирование для сред виртуализации | Хост / сокет / Объем данных | Сокет / Объем данных | На сокет (процессор) | На хост |
| Стоимость 1 лицензии (ориентировано) | От 85 тыс. р. | 190 тыс. р. | 70 тыс. р. (редакция Standard), 200 тыс. р. (редакция Enterprise Plus) | 45 тыс. р. (редакция Standard), 95 тыс. р. (редакция Advanced) |
Как вы видите, функционал и стоимость лицензий для каждого продукта довольно сильно отличается. Поэтому перед принятием решений о выборе того или иного решения стоит составить список требований к продукту резервного копирования Hyper-V, список имеющегося оборудования и необходимый функционал. У большинства известных продуктов резервного копирования есть бесплатные версии с некоторыми ограничениями, обычно их достаточно для оценки функционала.
Резервное копирование виртуальных машин на Hyper-V средствами Windows Server
Резервного копирования виртуальных машин (ВМ) на Hyper-V без затрат на покупку лицензий предполагает использование Windows Server Backup. Windows Server Backup является встроенной компонентой системы, имеет как графический интерфейс, так и командную утилиту wbadmin.
Начиная с Windows Server 2012 (Hyper-V Server 2012) можно выбирать необходимые для резервного копирования ВМ, до 2012 нельзя было создавать резервные копии отдельных ВМ – копировались все вместе.
Или через PowerShell:
После установки можно создать резервную копию ВМ с разными настройками:
Про параметры и синтаксис wbadmin:
Список зарегистрированных в системе резервных копий:
Создаем задание на резервную копию ВМ по расписанию через консоль Windows Server Backup.


Восстановление через утилиту или консоль:
восстановит из резервной копии созданный 20/09/2019 в 6:00 с диска F:
При все своей простоте и надежности бесплатное решение не может не обладать недостатками. Данное решение может устроить небольшие компании с 1-3 хостами и небольшим количеством ВМ. При росте количества ВМ и хостов становится сложно управлять резервным копированием.
В Windows Server Backup нет:
Back up Hyper-V virtual machines
This version of Data Protection Manager (DPM) has reached the end of support, we recommend you to upgrade to DPM 2019.
System Center Data Protection Manager (DPM) protects Hyper-V virtual machines by backing up virtual machine’s data. You can back data up at the Hyper-V host level to enable VM-level and file-level data recovery, or back up at the guest-level to enable application-level recovery.
Supported scenarios
DPM can back up virtual machines running on Hyper-V host servers in the following scenarios:
Host vs Guest backup
DPM can perform a host or guest-level backup of Hyper-V VMs. At the host level the DPM protection agent is installed on the Hyper-V host server or cluster and protects the entire VMs and data files running on that host. At the guest level the agent is installed on each virtual machine and protects the workload present on that machine.
Both methods have pros and cons:
Host-level backups are flexible because they work regardless of the type of OS running on the guest machines and don’t require the installation of the DPM protection agent on each VM. If you deploy host level back you’ll be able to recover an entire virtual machine, or files and folders (item-level recovery).
Guest-level back is useful if you want to protect specific workloads running on a virtual machine. At host-level you can recover an entire VM or specific files, but it won’t provide recover in the context of a specific application. For example to be able to recover specific SharePoint items from a backed up VM then you should do guest-level backup of that VM. Note that you must use guest-level backup if you want to protect data stored on passthrough disks. Passthrough allow the virtual machine to directly access the storage device and don’t store virtual volume data in a VHD file.
Online and offline backup
Depending on your DPM configuration, and what you are protecting, DPM’s online and offline backup behavior differs. If you use DPM 2012 R2 with UR3 (or later) to protect Hyper-V on Windows Server 2012 R2 (or later), the VMs continue running during the backup process. In this case, the rest of this section does not apply.
If you protect a Hyper-V server on Windows Server 2012, or if you use DPM 2012 R2 with UR1 or UR2, the following section applies to your configuration:
DPM works seamlessly with the Hyper-V Volume Shadow Copy Services (VSS) writer to ensure that consistent versions of virtual machines are captured and protected without affecting virtual machine access. The ability to back up open files is critical for business continuity. By default, DPM performs online backups that don’t affect the availability of virtual machines. To perform an online backup the following is required:
The Backup integration service must be enabled, so the operating system running on the virtual machine running must support Hyper-V integration services.
The guest operating system must support VSS (Windows 2003 server or later). Online backup isn’t supported if virtual machines are running Linux.
There should be no dynamic disks on the virtual machine.
All volumes can be either NTFS or ReFS
The VSS storage assignment for the volumes shouldn’t be modified.
The virtual machine must be running, and if the virtual machine is in a cluster the cluster resource group should be online. A Shadow Storage assignment of a volume inside the virtual machine mustn’t be explicitly set to a different volume other than itself.
If these conditions aren’t met DPM will perform an offline backup where the virtual machine is paused and placed in a saved state while the snapshot is taken, and then the virtual machine is resumed. This means the virtual machine is unavailable during the backup, usually a short period of less than a minute for many environments.
Protect VMs on SOFS clusters
DPM can back up VMs deployed on both NTFS and ReFS-based SOFS clusters. To protect VMs on SOFS clusters, do the following procedures:
Add the following machine accounts to the backup operator groups and share permissions:
To add the machine accounts to the backup operator groups, run the following steps for each node in the SOFS cluster:
Open the command prompt, and type, lusrmgr.msc to open Local Users and Groups.
In the Local Users and Groups dialog, click Groups.
In the list of groups, right-click Backup Operators and select Properties.
The Backup Operators Properties dialog opens.
In the Backup Operators Properties dialog, click Add.
In the Select Users, Computers, Services Accounts, or Groups dialog, click Object Types. The Object Types dialog opens.
In the Object Types dialog, select Computers and click OK. The Object Types dialog closes.
In the Select Users, Computers, Service Accounts, or Groups dialog, enter the name of the server or cluster, and click Check Names.
Once you have identified the computers, restart the node.
To give permissions to the share, do the following:
On a server where the SOFS/SMB share is hosted, open Server Manager > File and Storage Services > Shares.
Right click the VM storage share, and then click Properties.
In the Properties dialog, on the left navigation menu, click Permissions.
Click Customize permissions to open the Advanced Security Settings dialog.
On the Permissions tab, click Add.
Click Select a Principal.
In the Select User, Computer, Services Account, or Group dialog, click Object Types.
In the Object Types dialog, select Computers, and click OK.
In the Select User, Computer, Service Account, or Group dialog, enter the name of the Hyper-V node or cluster name you want to have permission.
Click Check Names to resolve the name, and click OK.
In the Permission Entry for Share dialog, select Full Control, and click OK.
In the Advanced Security Settings for Share dialog, click the Share tab and repeat steps 6-11 for the Share tab instead of the Permissions tab.
When you are finished adding permissions for the servers, click Apply.
This prepares the VMs on SOFS shares for the backup process.
How the Backup process works
DPM performs backup with VSS as follows. The steps in this description are numbered to help with clarity.
The DPM block-based synchronization engine makes an initial copy of the protected virtual machine and ensures that the copy of the virtual machine is complete and consistent.
After the initial copy is made and verified, DPM uses the Hyper-V VSS writer to capture backups. The VSS writer provides a data-consistent set of disk blocks that are synchronized with the DPM server. This approach provides the benefit of a «full backup» with the DPM server, while minimizing the backup data that must be transferred across the network.
The DPM protection agent on a server that is running Hyper-V, uses the existing Hyper-V APIs to determine whether a protected virtual machine also supports VSS.
If a virtual machine complies with the requirements for online backup and has the Hyper-V integration services component installed, then the Hyper-V VSS writer recursively forwards the VSS request through to all VSS-aware processes on the virtual machine. This operation occurs without the DPM protection agent being installed on the virtual machine. The recursive VSS request allows the Hyper-V VSS writer to ensure that disk- write operations are synchronized so that a VSS snapshot is captured without the loss of data.
The Hyper-V integration services component invokes the Hyper-V VSS writer in Volume Shadow Copy Services (VSS) on virtual machines to ensure that their application data is in a consistent state.
If the virtual machine doesn’t comply with online backup requirements, DPM automatically uses the Hyper-V APIs to pause the virtual machine before they capture data files.
After the initial baseline copy of the virtual machine synchronizes with the DPM server, all changes that are made to the virtual machine resources are captured in a new recovery point. The recovery point represents the consistent state of the virtual machine at a specific time. Recovery point captures can occur at least one time a day. When a new recovery point is created, DPM uses block-level replication in conjunction with the Hyper-V VSS writer to determine which blocks have been altered on the server that is running Hyper-V after the last recovery point was created. These data blocks are then transferred to the DPM server and are applied to the replica of the protected data.
The DPM server uses VSS on the volumes that host recovery data so that multiple shadow copies are available. Each of these shadow copies provides a separate recovery. VSS recovery points are stored on the DPM server. The temporary copy that is made on the server running Hyper-V, is only stored for the duration of the DPM synchronization.
Backup prerequisites
These are the prerequisites for backing up Hyper-V virtual machines with DPM.
Back up virtual machines
Set up your DPM server and your storage. When setting up your storage, use these storage capacity guidelines.
Set up the DPM protection agent on the Hyper-V server or Hyper-V cluster nodes. If you’re doing guest-level backup you’ll install the agent on the VMs you want to back up at the guest-level.
In the DPM Administrator console click Protection > Create protection group to open the Create New Protection Group wizard.
On the Select Group Members page, select the VMs you want to protect from the Hyper-V host servers on which they’re located. We recommend you put all VMs that will have the same protection policy into one protection group. To make efficient use of space, enable colocation. Colocation allows you to locate data from different protection groups on the same disk or tape storage, so that multiple data sources have a single replica and recovery point volume.
On the Select Data Protection Method page, specify a protection group name. Select I want short-term protection using Disk and select I want online protection if you want to back up data to Azure using the Azure Backup service. If this option isn’t available complete the wizard to create the group and then modify the protection group settings to select this option. You can store data in Azure for up to 3360 days.
If you have a standalone tape or tape library connected to the DPM server you’ll be able to select I want long-term protection using tape.
In Specify Short-Term Goals > Retention range, specify how long you want to retain disk data. In Synchronization frequency specify how often incremental backups of the data should run. Alternatively, instead of selecting an interval for incremental backups you can enable Just before a recovery point. With this setting enabled DPM will run an express full back just before each scheduled recovery point.
If you’re protecting application workloads, recovery points are created in accordance with Synchronization frequency, provided the application supports incremental backups. If it doesn’t then DPM runs an express full backup, instead of an incremental backup, and creates recovery points in accordance with the express backup schedule.
If you enable long-term storage to tape, in Specify Long-Term Goals > Retention range, specify how long you want to keep your tape data (1-99 years). In Frequency of backup select the backup frequency that you want.
The backup frequency is based on the specified retention range. When the retention range is 1-99 years, you can select backups to occur daily, weekly, bi-weekly, monthly, quarterly, half-yearly, or yearly.
When the retention range is 1-11 months, you can select backups to occur daily, weekly, bi-weekly, or monthly. When the retention range is 1-4 weeks, you can select backups to occur daily or weekly.
On a stand-alone tape drive, for a single protection group, DPM uses the same tape for daily backups until there is insufficient space on the tape. If you enabled colocation, data resources are colocated on the tape.
If you configured long-term storage to tape, on the Select Tape and Library Details page specify the tape and library that’ll be used for back up of this protection group. You can also specify whether to compress or encrypt the backup data.
In the Review disk allocation page review the storage pool disk space allocated for the protection group.
Total Data size is the size of the data you want to back up, and Disk space to be provisioned on DPM is the space that DPM recommends for the protection group. DPM chooses the ideal backup volume, based on the settings. However, you can edit the backup volume choices in the Disk allocation details. For the workloads, select the preferred storage in the dropdown menu. Your edits change the values for Total Storage and Free Storage in the Available Disk Storage pane. Underprovisioned space is the amount of storage DPM suggests you add to the volume, to continue with backups smoothly in the future.
On the Choose Replica Creation Method page, specify how the initial replication of data in the protection group will be performed. If you select to replicate over the network we recommended you choose an off-peak time. For large amounts of data or less than optimal network conditions, consider replicating the data offline using removable media.
On the Consistency Check Options page, select how you want to automate consistency checks. You can enable a check to run only when replica data becomes inconsistent, or according to a schedule. If you don’t want to configure automatic consistency checking, you can run a manual check at any time by right-clicking the protection group and selecting Perform Consistency Check.
After you create the protection group, initial replication of the data occurs in accordance with the method you selected. After initial replication, each backup takes place in line with the protection group settings. If you need to recover backed up data note the following:
Back up virtual machines configured for live migration
When virtual machines are involved in live migration, DPM continues to protect the virtual machines as long as the DPM protection agent is installed on the Hyper-V host. The way in which DPM protects the virtual machines depends on the type of live migration involved.
Requirements for maintaining protection
The following are requirements for maintaining protection during live migration:
The Hyper-V hosts for the virtual machines must be located in a System Center VMM cloud on a VMM server running at least System Center 2012 with SP1.
The DPM protection agent must be installed on all Hyper-V hosts.
DPM servers must be connected to the VMM server. All Hyper-V host servers in the VMM cloud must also be connected to the DPM servers. This allows DPM to communicate with the VMM server so DPM can find out on which Hyper-V host server the virtual machine is currently running, and to create a new backup from that Hyper-V server. If a connection can’t be established to the Hyper-V server, the back up fails with a message that the DPM protection agent is unreachable.
All DPM servers, VMM servers, and Hyper-V host servers must be in the same domain.
Details about live migration
Note the following for backup during live migration:
Live migration protection doesn’t support backup to tape.
If a live migration transfers storage, DPM performs a full consistency check of the virtual machine, and then continues with express full backups. When live migration of storage occurs, Hyper-V reorganizes the virtual hard disk (VHD) or VHDX which causes a one-time spike in the size of the DPM backup data.
On the virtual machine host, turn on auto-mount to enable virtual protection, and disable TCP Chimney Offload.
DPM uses port 6070 as the default port for hosting the DPM-VMM Helper Service. To change the registry:
Set up protection for live migration
To set up protection for live migration:
Set up the DPM server and its storage, and install the DPM protection agent on every Hyper-V host server or cluster node in the VMM cloud. If you’re using SMB storage in a cluster, install the DPM protection agent on all cluster nodes.
Install the VMM console as a client component on the DPM server so that DPM can communicate with the VMM server. The console should be the same version as the one running on the VMM server.
Assign the DPMMachineName$ account as a read-only administrator account on the VMM management server.
After all virtual machines running on the Hyper-V hosts in the VMM clouds are discovered in VMM, set up a protection group and add the virtual machines you want to protect. Note that automatic consistency checks should be enabled at the protection group level for protection under virtual machine mobility scenarios.
After the settings are configured, when a virtual machine migrates from one cluster to another, all backups continue as expected. You can verify live migration is enabled as expected as follows:
Check the DPM-VMM Helper Service is running. If it isn’t start it.
Run the following query to validate the VMMIdentifier parameter in the PhysicalPathXML for a particular virtual machine. Replace VMName with the name of the virtual machine.
select cast(PhysicalPath as XML) from tbl_IM_ProtectedObject where DataSourceId in (select datasourceid from tbl_IM_DataSource where DataSourceName like ‘% %’)
Run manual migration
After you complete the steps in the previous sections, and the DPM Summary Manager job completes, migration is enabled. By default, this job starts at midnight and runs every morning. If you want to run a manual migration, to check everything is working as expected, do the following:
Open SQL Server Management Studio and connect to the instance that hosts the DPM database.
In the SQL Server Management Studio, expand SQL Server Agent, and then expand Jobs. Right-click ScheduleID that you noted, and select Start Job at Step.
Note that backup performance is affected when the job runs. The size and scale of your deployment determines how much time the job takes to finish.
Back up replica virtual machines
If DPM is running on Windows Server 2012 R2 or greater, then you can back up replica virtual machines on a secondary server. This is useful for several reasons:
A replica virtual machine is turned off until a failover is initiated, and VSS can’t guarantee an application-consistent backup for a replica virtual machine. Thus the backup of a replica virtual machine will be crash-consistent only. If crash-consistency can’t be guaranteed, then the backup will fail and this might occur in a number of conditions:
The replica virtual machine isn’t healthy and is in a critical state.
The replica virtual machine is resynchronizing (in the Resynchronization in Progress or Resynchronization Required state).
Initial replication between the primary and secondary site is in progress or pending for the virtual machine.
Migration or failover of the replica virtual machine is in progress
Recover backed up virtual machines
When you can recover a backed up virtual machine, you use the Recovery wizard to select the virtual machine and the specific recovery point. To open the Recovery Wizard and recover a virtual machine:
In the DPM Administrator console, type the name of the VM, or expand the list of protected items and select the VM you want to recover.
In the Recovery points for pane, on the calendar, click any date to see the recovery points available. Then in the Path pane, select the recovery point you want to use in the Recovery wizard.
From the Actions menu, click Recover to open the Recovery Wizard.
The VM and recovery point you selected appear in the Review Recovery Selection screen. Click Next.
On the Select Recovery Type screen, select where you want to restore the data and then click Next.
Recover to original instance: When you recover to the original instance, the original VHD is deleted. DPM recovers the VHD and other configuration files to the original location using Hyper-V VSS writer. At the end of the recovery process, virtual machines are still highly available. The resource group must be present for recovery. If it isn’t available, recover to an alternate location and then make the virtual machine highly available.
Recover as virtual machine to any host: DPM supports alternate location recovery (ALR), which provides a seamless recovery of a protected Hyper-V virtual machine to a different Hyper-V host, independent of processor architecture. Hyper-V virtual machines that are recovered to a cluster node will not be highly available. If you choose this option, the Recovery Wizard presents you with an additional screen for identifying the destination and destination path.
Copy to a network folder: DPM supports item-level recovery (ILR), which allows you to do item-level recovery of files, folders, volumes, and virtual hard disks (VHDs) from a host-level backup of Hyper-V virtual machines to a network share or a volume on a DPM protected server. The DPM protection agent doesn’t have to be installed inside the guest to perform item-level recovery. If you choose this option, the Recovery Wizard presents you with an additional screen for identifying the destination and destination path.
DPM does not support item level recovery of a Dynamic Disk within a Guest VM. For this the Guest VM should have a Basic Disk.
In Specify Recovery Options configure the recovery options and click Next:
In the Summary screen, make sure all details are correct. If the details aren’t correct, or you want to make a change, click Back. If you are satisfied with the settings, click Recover to start the recovery process.
The Recovery Status screen provides information about the recovery job.
Restore an individual file from a Hyper-V VM
You can restore individual files from a protected Hyper-V VM recovery point. This feature is only available for Windows Server VMs. Restoring individual files is similar to restoring the entire VM, except you browse into the VMDK and find the file(s) you want, before starting the recovery process. To recover an individual file or select files from a Windows Server VM:
Restoring an individual file from a Hyper-V VM is available only for Windows VM and Disk Recovery Points.
In the DPM Administrator Console, select Recovery view.
Using the Browse pane, browse or filter to find the VM you want to recover. Once you select a Hyper-V VM or folder, the Recovery points for pane displays the available recovery points.

In the Recovery Points for pane, use the calendar to select the date that contains the desired recovery point(s). Depending on how the backup policy has been configured, dates can have more than one recovery point. Once you’ve selected the day when the recovery point was taken, make sure you’ve chosen the correct Recovery time. If the selected date has multiple recovery points, choose your recovery point by selecting it in the Recovery time drop-down menu. Once you chose the recovery point, the list of recoverable items appears in the Path pane.
To find the files you want to recover, in the Path pane, double-click the item in the Recoverable item column to open it. Select the file, files, or folders you want to recover. To select multiple items, press the Ctrl key while selecting each item. Use the Path pane to search the list of files or folders appearing in the Recoverable Item column.Search list below doesn’t search into subfolders. To search through subfolders, double-click the folder. Use the Up button to move from a child folder into the parent folder. You can select multiple items (files and folders), but they must be in the same parent folder. You can’t recover items from multiple folders in the same recovery job.

Once you’ve selected the item(s) for recovery, in the Administrator Console tool ribbon, select Recover to open the Recovery Wizard. In the Recovery Wizard, the Review Recovery Selection screen shows the selected items to be recovered.
On the Specify Recovery Options screen, if you want to enable network bandwidth throttling, select Modify. To leave network throttling disabled, select Next. No other options on this wizard screen are available for VMware VMs. If you choose to modify the network bandwidth throttle, in the Throttle dialog, select Enable network bandwidth usage throttling to turn it on. Once enabled, configure the Settings and Work Schedule.
On the Select Recovery Type screen, select Next. You can only recover your file(s) or folder(s) to a network folder.
On the Specify Destination screen, select Browse to find a network location for your files or folders. DPM creates a folder where all recovered items are copied. The folder name has the prefix, DPM_day-month-year. When you select a location for the recovered files or folder, the details for that location (Destination, Destination path, and available space) are provided.

On the Specify Recovery Options screen, choose which security setting to apply. You can opt to modify the network bandwidth usage throttling, but throttling is disabled by default. Also, SAN Recovery and Notification aren’t enabled.
On the Summary screen, review your settings and select Recover to start the recovery process. The Recovery status screen shows the progression of the recovery operation.